Posted on 11 Comments

Custom Framing on an Artist’s Budget

One of the more painful and costly steps along the way to an art show or convention for us, and other artists we know, is most always framing.

It seems that artists and artisans anymore, can be some of the most heavily exploited tradesmen when it comes to tools and supplies …and frames are certainly no exception.

Art supplies tend to be priced for Warhol-famed artists, design agencies with multi-million dollar clients, or students who simply have to have these things, and will have to take out loans and grants accordingly; Frames are often priced for artists of Ryden renown, or remarkably wealthy art buyers – factor in huge percentages for art sales through galeries, and it is no wonder that the gallery owner lifestyle of nice cars and sipping champagne contrast so beautifully with those of the artists supported: which I suppose for most of us… well, I don’t know how you get by, but lets say “robbing liquor stores for brush money” as a rather broad example.

And since for any show or convention it is good – if not mandatory, to have hang-able art. Many of us artists need to get creative if we wish to account for a 40% cut on sale price, and frames, without demanding a “Just who does he think he is?” sort of price.

One route, of course, is to gallery-wrap, or museum wrap paintings and giclees in a way that makes for a nice display without the need of a frame. Add a touch of color or a reflected image to the overlap, and such things do really tend to look very nice… though modern by default. Gallery wrapping and museum wrapping is available as an option for ready canvas through most any art supply provider, and having giclees stretched these ways is an option with most decent giclee printer. Doing this one one’s own is moderately difficult for gallery wrap, and strenuous for museum wrap – but by no means impossible.

If however your works are already stretched and mounted, with staples down the sides, or if they are painted/drawn/engraved on boards or paper and absolutely need to be framed – there are still a few creative, inexpensive, and simple ways to go.

One of which – if your works will fit standard frame sizes, is to go on “50% off!” weeks (we like to call them “regular price weeks”) to Hobby Lobby or Michael’s and buy their pre-made frames. Another solution of course is to go to places such as Target and Walmart and browse, looking for discounted frames that can be redecorated and customized to look nice… perhaps even to become works of art in their own.

One problem I have found with many of the ready-made frames (and even many custom frames), something I particularly dislike, is that I find many of these frames are either plastic, or low-grade wood, either made to look like better wood by way of plastic/acrylic veneers or overlay, ornate clay designs painted or coated over, or by other means. The most standard being those which are low-grade wood with the clay and paint overlay, which tends to chip and break in shipping… if it isn’t already broken in this way at time of purchase. The ones at non-art stores tend to be plastic molding with a plastic wood-grain sheet ironed onto them… again… trying to avoid that.

So, yesterday, after browsing many ready made frames at all the aforementioned stores, not finding anything I liked at a reasonable price – and finding mostly overpriced junk, I decided to try to make my own.

The first step was a trip to the hardware store for lumber, where I purchased four 6’x4″x1″ pieces of wood.. having struck out on all avenues in looking for a source for the wood strips framing galleries use. I’ll have to try that some other day.

So… wood…

I’d like to say I went for the fine cherry, a nice fire maple, or something moderately exotic – but what I ended up going for was a compromise.

At Home Depot, I found their “exotic wood” be be very exotically priced. I am used to prices being high on hardware at woodcraft – but Woodcraft’s prices certainly beat (by light years) the wood prices at Home Depot. I will have to remember: Woodcraft for wood, Home Depot for hardware.. but, of course it was late at night when we went… So Home Depot was pretty much where we were going for the lumber.

Pine being cheap and sub-quality wood, I looked to avoid that route – but in the good wood section I found what is called “select pine” – which is not quite gold-grade heartwood pine, but certainly not shabby construction-grade pine. It is nice and heavy, very dense actually, with a really fine grain and very tiny knots. I was rather surprised by how sturdy and dense it was, and at $4.19 a  6 foot piece – I decided to give it a try (and having tried it, I am actually quite happy with it).

[Edit] Having returned, and taking a closer look at Home Depot’s stock, I also found some really nice Maple there for about $1.40 a linear foot – still more expensive than the pine, about twice the price but certainly not bad. I also found cherry and red oak shelf capping for around $1 a foot, which I plan to use in future projects in place of the moulding below.

moulding
Molding

I also grabbed some decorative wood strips from Home Depot (sort of like above, but not the same design)… rounded and decorative on one side, flat on another. My plan is to use these to make the frames a touch more ornate. The price wasn’t bad.. $2.16.. Oh? Not “per piece” .. that’s a linear foot? Okay… I bought one six foot section. Also in my arsenal is some brass chain at Hobby Lobby (clearance priced)… about 120 inches of it. Home Depot had wood appliques – but their prices on those were ridiculous – I am supposing they were trying to get as much as possible out of cabinet makers. The things are incredibly cheap by comparison at Michaels… I’ll have to go there tomorrow, as they didn’t have them at Hobby Lobby and I wasn’t about to pay the Home Depot price for them.

Wood Applique
Wood Applique

So… first step: Cutting the wood

So… first step… measuring the wood.

These artworks are 5×7 inches. So, I want the inside of my frame to be about 1/8 of in inch smaller than that. Typically I’ll sit there and figure up the best mathematical formulae to get the perfect result – but diving right in, I simply measured 1/8 of an inch in, and used my 45-degree plastic triangle to mark where the first 45 degree cut would intersect that drawn line. I measured 6 + 3/4 (7 inches minus two times 1/8 of an inch) of an inch along that line, marked that point, and used the triangle to draw a line where the next cut would go.

From there I carefully and precisely made the first cut on the table saw, using my 45-degree angle-guide. Then I carefully and precisely made my second cut. From there it was just a matter of sliding forward my 45-degree guide, placing one edge against the (stopped) table saw blade, and lining up the straight guide to the end of that piece. After this I could just cut, flip the wood over, cut, and flip the wood over, making perfectly identical trapezoidal wooden pieces… my 7-inch sides.

Table Saw: The same 45 degree jig and same position as the very first cut. The difference is the piece is flipped and moved to the guide in order to reflect the opposite angle, and the achieve the right length. This can also be done with a miter box, but the table saw really makes it go much faster.
Table Saw Guide - My clamp keeps the wood from popping/leaning up, or sliding along the guide.

After cutting the first two, just in case my angle guide was not entirely accurate, I matched up corners on the cut pieces, and checked them with my triangle, to make sure they were squaring up. They weren’t. So I made an adjustment of half a degree – and used these pieces over and over again until the angle was perfect.

One of the cut pieces. Remember - Trapezoid, not parallelogram. No adjustments need to be made to the guide for this, just flip the wood. Also note my sleeves... not recommended for anyone without a death wish. Loose sleeves, long sleeves, are not the best attire for workshops.

I made 18 of these long sides, saving the first two ‘test pieces’ for use in making the shorter sides, since they were shorter after all the test angling.

Then I made the 5-inch sides, in the same manner as above, until I 18 of those as well.

After this, I needed to make it so that the artwork could rest inside the frame, meaning that 1/8 inch recess (rabbet) planned for needed to be carved into the inside dimensions along the back of the frame-to-be. This is a good time to have a router (and a router table is all the better).

*If you do not have a router, which I am sure a lot of you may not, I would recommend starting with decorative beading (the sort of trim that, in a house, runs along a floor or a ceiling… available at most lumber stores). From there you can just build a simple square and square-edged frame for your work, with the inside of this being the exact size of your artwork (n0 need for a rabbet), but use the measuring and cutting steps above on the trim. The trim can be assembled on top of the box frame, glued, pressed, and clamped for a very nice look and sturdy frame. Those are the basics… I’ll go over that particular method in more detail, but it will have to wait for another post*
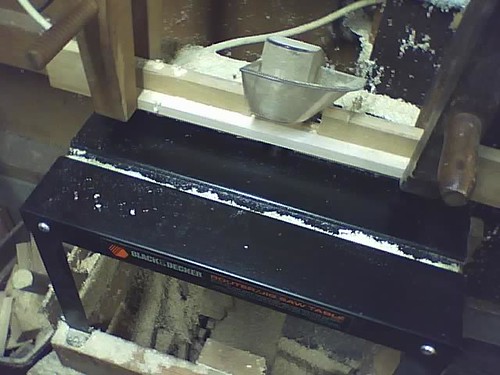
Router and Router table - I set up two guides for this one. One to set how far back towards the bit the wood piece can go, one to keep it down to the table (while at the same time to keep my fingers away from the bit)

I used a router bit which has a curved into flat bevel, called an “ogee”. The flat edges would hold the artwork well, and the rounded surface would allow for the least amount of surface contact on the art side of the artwork.

common router bits and their profiles
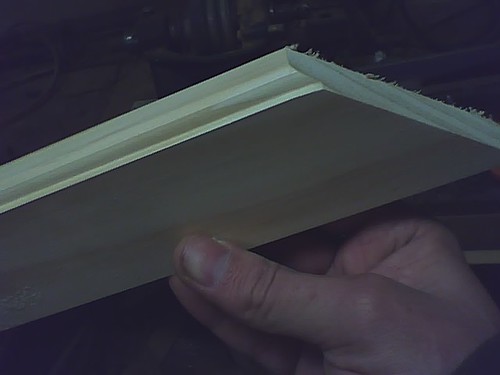
Routed edge - better than a rabeted edge, because the curve keeps more of the arts surface away from the frame itself, which prevents a rubbing on the art surface.
Routed edge - better than a rabeted edge, because the curve keeps more of the art's surface away from the frame itself, which prevents a rubbing on the art surface.

I also used this same decorative “Ogee” bevel on the inside front as well. As a bonus, being the same on the inside dimension front to back, I could choose which side looked the best (according to the smoothness of the cut, the look of the grain, dents and dings, etc.) .

Having chosen which side would face front, I then took to beveling the Outer Edge on front side, giving it a smoothed and decorative face on the front (inside dimension and outside), but leaving the back flat and flush. For several of my frames, I also made the back outer edge beveled as well, giving the frames a nice rounded edge.
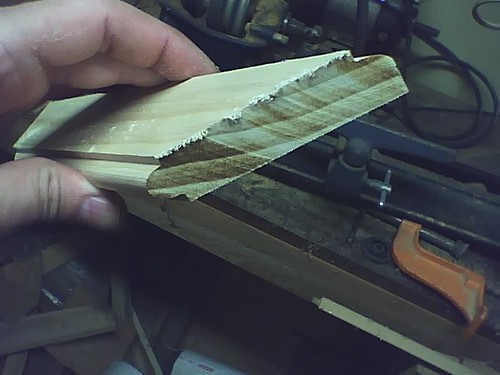
Three routed edges - two on the inside near the artwork, one on the front and outside of the frame. The fourth edge is left plain so it can be flush with the wall.
Three routed edges - two on the inside near the artwork (against my thumb), one on the front and outside of the frame. The fourth edge is left plain so it can be flush with the wall.

Once I had all my pieces done, I quickly sanded off all frayed edges and burs from my cuts, so the frayed ends would not get in the way of the next step: gluing.
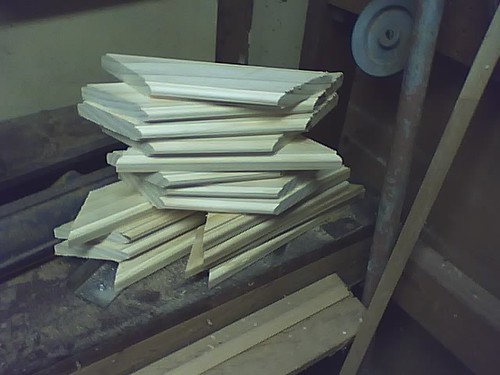
A stack of frame pieces, ready to debur, glue, and press.

Glue, actually holds more securely than nails or screws, if done properly, and of course keeps unsightly nails and screws from your frames. Such also negates the risk of splitting your pieces with such fasteners during the construction process.. which would be a terrible waste of all the work done up to now. There are special fasteners for framing (to be used later), but the glue is most important.. and will make that fastener step much easier if you choose to use fasteners.

I used a four-point box clamp for this. It makes jobs like framing, assembling stretcher bars for canvases, making boxes/cabinets, all go much more smoothly with these sort of clamps. If you don’t have them, I’d recommend using two (preferable four) bar clamps or pole clamps for this step.

4-way clamp around the frame, glue at each edge. The pressure pushed glue deep into the end grain, giving the frames a very strong and sturdy bond.

Put glue along the ends of each piece, in thin streams, but try to cover most of the ends, and try as best you can to get the very edges of each end. Clamp them together, make sure all pieces line up square and even. Un-clamp and re-clamp if necessary… Such is much better than letting it dry uneven and having to redo this step or sand things down.

Let the frame sit this way for at least a half hour (preferably longer) before moving it. If it has only been sitting a half hour, remove move it carefully and then leave it be. You will however get better results if you leave each frame clamped for an hour or more. I plan to use 3/8 corrugated fasteners on each corner – they aren’t completely necessary, but they give a bit of added peace of mind to neurotic people such as me.

corrugated fastener
corrugated fastener
Not-so-finished product. Staining and other decoration yet to be done, as well as the addition of the hanging hardware. The artwork is not secure yet btw; It is just there for the photo.

Next steps – added (wood) decoration, staining, added decoration (metal), placing the artwork, hardware (for hanging).

(Next installment)

Posted on

Clockwork Cheshire Cat and Mechanical Moon Men

I haven’t been updating much, you may have noticed – Web and print ad work for clients, as well as the last of the commissioned paintings have kept me busy.

The painting I am working on is a  large one; and since I work in the same amount of detail whether working small or large, it is still going to be a while before I get that one finished.

Most of my client work is for a studio that works with Disney, hosting art events for Disney artists, and selling special edition Disney merchandise; I have a large portfolio of fliers, print ads, and web work relating to these things – and perhaps this is beginning to sink a bit into what I do in my free time – as I just had to do my own version of the Cheshire Cat to round out this last series of engravings (below top).

This recent series began with my needing to get the cover art for the Halloween issue of Gatehouse Gazette (below bottom), and since I buy these things in threes, and cannot resist a fresh plate to engrave on, I ended up using more time that I had scrawling out designs in tiny detail – and I’ll tell ya – my hands and eyes are hating me for it right now.

Well, at least I managed another black and white for my “Airships and Tentacles” series – a series I realized this week I have yet to get around to posting an actual premise for. Innsmouth Free Press will be getting that info first, as I have an upcoming interview with them, and they asked the question.

Speaking of interviews, if you have the time, take a look at my recent one with Dark Roasted Blend (which was also picked up by IO9)

Also, I am pleased to announce, that my painting “Sabicu” will be the cover image for the upcoming installment of the amazing fantasy magazine: Beneath Ceaseless Skies.

Anyway… the art… below… BTW metallic prints and giclees of these are available in the Store

Cheshire Cat
Cheshire Cat


Attack from Planet Moon

Attack from Planet Moon (yes, it is a silly title for a silly picture)

I have a Special Plan for this World
I Have Special Plans for this World (Cover for Gatehouse Gazette October)

Posted on

Happy Accident – new print available

I love the printer I work with. They are not only fantastic at what they do, but wonderful to deal with

When I mess up the lines of communication, sometimes some really nice things can happen, such as this new 24×12 inch giclee of “the Machine”

camera phone pic of the thing stretched and mounted

I switched this order over to them because the last printer took forever (months) getting the artist’s prints from this batch to me.

I could not make up my mind if I wanted a new proof or not, first I did want one at half size, then I didn’t.

The reason being was that I already had their color profiles, and they matched up perfectly with those of the printer I had used to make the artist’s prints for this series.

Even though I did not need one, my first impression was to get a proof anyway, just to be thorough – but I decided instead to go ahead and print full-size, just in case it came out right. Choosing a different printer to run the series meant another artist print was called for – and this would be one of them.

Well, in my back and forth, I ended up with a 24 x 12 inch print instead of the 48 x 12. I thought I would sell this smaller artists print as just that… but when I stretched and mounted it, I realized it was the perfect size:

At 24 inches wide, it fills a decent amount of wall space. It looks great at this size, and is probably the smallest this wide-format image could be printed and still show all the detail and give the same feel. Most importantly – it offers a cheaper alternative to the huge 48 x 24 prints, which are a bear to stretch, mount, and ship (finding 48″ stretcher bars is tough, finding a 52x28x3 inch box is tough, shipping it out is very expensive).

On the 48×24 inch machine print in particular – I have had a lot of people tell me they really want one, but, as no surprise, things are too tight at the moment for large purchases. It does sadden me a bit that I cannot go any lower on the big ones, but I can offer alternate sizes.

Stretched and mounted, these are $165, but are reduced through this week to $125 (my typical introductory price thing). I do this because I know that seeing my art on the walls of people’s homes, makes people want one for themselves.

Posted on

New-found techniques for hand-embellishing fine art prints

Hand-embellishing is something I like to do with the earliest prints of any series, adding a higher degree of unique-ness to the prints within my limited runs.

Up till recently, I’ve had but two techniques at my disposal for the hand-embellishing of prints: First being painting upon canvas or fine-art paper giclees.

When embellishing giclees, I paint in acrylics and hand-varnish each piece. This can be a bit time-consuming, as I have to allow proper time for each piece to breathe before painting, and also have to hand-varnish these works afterward. Especially involved are those pieces where I get carried away, as I have sold several giclees which were almost their own new paintings with all I’ve added and redone within the piece.

To me, this is not only a way to make pieces unique, but I also enjoy the ability to go back and do things I might have thought to have done with the original works: adding detail to existing elements, enhancing colors, or often creating new elements within the piece.

But when it comes to the metallic prints, I’ve mostly been limited to details in silver and gold metallic inks. Such is something that meshes incredibly well with the black and white engravings (especially when accenting prints made from works in which the originals had gold or silver leafing on them). With color metallic prints, however, I’ve often been limited to adding a bit of metallic glimmer to rivets and nails, adding various reflections to shiny bits within the works, or adding a bit of metallic shine to stars in the background, perhaps even creating new constellations.

Recently, I gave pigment ink markers a try, beginning with markers sold especially for photo coloring/ photo tinting – Zig Photo Twin Markers – markers typically used for making color photos out of black and white photos.

I am pretty happy with the results. Going into this, I was concerned that I might only be able to color and shade with them, and that the differences in color or texture would be obvious enough to break the piece. The inks however added themselves nicely to the prints, leaving little to no change in surface reflectivity.

There was also a lot more control in tinting than I had expected. With the first stroke, I was somewhat disappointed, as the color I laid down only barely showed up at all. But, with another stroke more color and definition showed, and another, until I had just the right amount. I continued this process, not just to add color and shading, but to add definition to stitches and wood grain. Eventually I was also adding new ropes and cords, new flowers and blooms floating through the air, and shadowy tentacles within the mist and fog.

The fine brush-like tips on one side of the marker are perfect for detailing or for coloring large areas, and the fine tips at the other end add more than enough control for this sort of work. That the color lays down evenly and gradually, makes possible everything from the slightest color shifts, to stark new creations.

I think future print projects may involve printing some of my works out completely in black and white, and then hand-coloring each print. I don’t know which pieces I could do this for, just yet – but it will be of future and yet un-released works, since I fear making something that special of existing works would not be kind to those who have bought prints of those works already.

###

In case you are wondering which of these prints come hand-embellished – the general rule is that the first artist print (I of II), plus the first five percent of a limited and signed edition (for example #s 1, 2, 3 of a 50-print edition), are hand-embellished. If a buyer happens to land themselves one of these, I write just to make sure that a hand-embellished print is what they want… on the off chance that they would prefer a vanilla and true to the original print.

Many artists might prefer to hold onto their A.P.s, #1s, hand-embellished versions, and other special items for dead last – offering them as the special items they are (and priced accordingly). I, however, tend to give these at the standard price, to those people who order first, as a reward for kicking off a series.

The reason for this being that, though I can show you many images of my works online, they will never match up to the high-resolution and full size prints. I believe that seeing these prints in person, is what makes people want them most. I often watch print sales “bloom” out from those localities wherein my prints already reside, and often hear from buyers that they’ve seen one of my works on the wall of a friend, in a hotel lobby, dentists office, or other venue.

It serves me well to get my works out where they can be seen in full scale – one of many reasons I am thankful for, grateful for, every last buyer I have had.

Posted on

Cybraphon – An Awesome Digilog Machine

Cybraphon is the latest project from Edinburgh-based artist collective FOUND (Ziggy Campbell, Simon Kirby and Tommy Perman).

Cybraphon is a collection of musical instruments, a robotic nickelodeon, played by wheels and by mechanical arms, an intricate assembly of clockwork parts and instruments, electronically powered, and controlled through MIDI and DMX.

Though not powered by steam, and not controlled by music cylinders, it is still an incredible piece of work, and an equally incredible work of art.

You can read more about this machine, hear more songs, and see more pictures and videos at http://cybraphon.com/

Posted on

The Dark and Spooky Automated World of Thomas Kuntz

Death and Resurrection: One of many amazing clockwork pieces by Thomas Kuntz to be featured in the Archive.

Thomas Kuntz, a professional artist for over 20 years, began as a sculptor of Commercial Toys, but later gained notoriety circa ’89-98 as a pioneer in the making of model kits based on old silent films like Nosferatu, The Man Who Laughs, Vampira, and others.

After a period of time Kuntz found that merely sculpting his dark creations was not nearly enough for him, and that he wanted to give life to his creations through mechanical, perhaps supernatural means… This change in method resulted in some of the darkest and most interesting automations known to man, and not nearly as many fatalities and disappearances as may be rumored…

[Read the rest of this article, view images, watch more films at the Miskatonic Archive]

Posted on

Depression Punk Pondered

“There is in every true woman’s heart, a spark of heavenly fire, which lies dormant in the broad daylight of prosperity, but which kindles up and beams and blazes in the dark hour of adversity.”

-Washington Irving

Conversations between Bethalynne and I, regarding “Depression Punk” began about a year and a half ago – though until recently, I never really managed to consider these concept so seriously. Such conversations were typically a source of amusement, just silly banter and rampant conceptualizing – most often fueled by late nights and spoiled grain.

Of course when these discussions began, we had our sites set on the finer things in life: The extravagance of steam culture had us bright eyed dreaming of all the wondrous things we could make to wear, decorate with, perhaps even display and sell. We drempt aloud of wondrous things made of fine woven fabrics, intricate machines and devices made of brass gears and parts encased in fine ornate hardwood shells, castings in silver and on brass, and huge monumental artworks so complex and weird that they might be new wonders of the world. The things we would make, the things we would do, and the places we would go dressed to the nines in ornate brass, tweed, and brown leather; Whole worlds of arts and craftsmanship were opening up to us – our only limits being time and focus.

… Though I could hardly focus on anything at the time, barely getting any rest between stuffing prints into boxes and tubes; I was overwhelmed, stressed, and enthused by the sudden and unexpected popularity of my site and my works. We were still poor as we had began, and had a way to go before building a solid footing with our then fortunate circumstances. We found ourselves so incredibly in demand that I had an impossible time choosing from the avenues that were open before us.

One weekend night, we found that the television was becoming all-too heavily dominated by stressed stock brokers and stock owners, failing corporations and other other such things not concerning struggling near-homeless artist renters — In this – we non-stock-owners/non-homeowners had to flip around for a while to find anything remotely interesting to relax to… anything that did not have to do with AIG or that credit stuff we with no credit had little worry over.

For some god-awful reason we found ourselves up late at night staring wide-eyed and zombified at the 80’s Robin Williams train wreck that was called “Popeye”, a deliciously terrible and ill-advised film based upon the adventures of the spinach-munching pipe smoking depression-era pugilistic hero of… of… well, someone had to have watched these cartoons… perhaps even on purpose.

Somehow, after an hour or so of watching, we found that we were still able to form words, and combine them into sentences; Discussion ensued, and that led us to indirectly this depression punk topic via our starting topic… “Hill Punk”

Hill Punk, we decided, would be a subculture where bands played on clay jugs, rubber bands and washboards, wherein the most fashionable would be those wearing the most ragged and worn wooden barrels, those with the most interesting objects tangled within their soup-crusted beards, and the finest art consisted of the most  hideously perfect rusty pipes and cloth tape, held together by twine and thrice-darned stockings. Women would don hair nets over tightly-pulled bob-tailed she-mullets, kids would wear burlap sacks patched with cigar ribbons, accented by sling-shots and chewing tobacco tins.

Figuring that this might possibly conceived as politically incorrect and insensitive by many a fine and upstanding person with Appalachian roots, we thought that this should concept should cover more regions than just the one, and should stem also into the cities and burbs.

This caused up to branch into a more Oliver Twist aspect of steam culture: One encouraging the wearing of rag-tag garments bound by hastily-stitched patchwork, torn gloves and battered hats powdered and blemished by coal and by soot – decorated with pins and necklaces of broken finery and salvaged machines – deviating from the lavishly steampunk culture to a culture of salvaged things and frugal sensibilities.

Gone are the days of stripping the finest wood from the most beautiful forests, and gone are the days of fine ivory canes, expensive perfumes made from plentiful sea mammals. No longer is it in good taste to rest one’s argyle-socked feet upon an intricate, rare, and expensive conversation piece from the depths of deepest and darkest Borneo. No longer is it safe or tasteful to boastfully cover oneself in brilliant jewels and precious metal at gatherings or when in the public eye. Expeditions to far away lands for science and discovery are near-impossible to finance. Among the wealthy, conversations surrounding the proper storage of kitchen grease, preservation of furniture, and the hand-washing of doilies have come to be the most fashionable topics of conversation, hosted in a small cluster of open rooms – the rest of these mansions sealed off for preservation of firewood and limited household staff.

Children in over-sized hand-me downs play games with toys made of salvaged and irreparable devices, things found in junk yards and gutters. They make jewelry from anything salvaged and shiny. For added flair, they wear pocket watches which neither work, nor retain any valuable parts. They make toys and pieces of art from things once functional, interesting and inspiring in appearance only – imagination fueling purpose and function.

Boxes fashioned of glued gears, nails, tin cans and and soldered spoons open gateways to the lush and plentiful lands of Africa; Necklaces made of broken piggy banks and found brass are merely disguises for secreted magickal jewels, or perhaps serve as a key to an ancient and faraway treasure trove – the keyhole cleverly disguised as a crack in a crumbling wall somewhere within a crumbling and abandoned estate.

Meet “Depression Punk”, the somewhat less-fortunate sibling to the steampunk, dieselpunk, clockpunk movements, a symbol for our times – powered by innovative re-purposing, the crafting of interesting and intriguing things from things passed over, wherein form and function collide with outcomes decided by practicality and frugality – imagination stepping in wherever function is not essential.

It only recently occurred to me, that these things are around in mass, and every bit as wonderful as the purely steampunk things I love but cannot buy or afford to make. Where one might see a failed steampunk or clockpunk piece, I have begun to see a very successful and brilliant depression punk piece in its stead… and it is odd that this in only just now rubbing off on me… that I am finally seeing the trees through the forest.

One of my Bethalynne’s greatest traits, is the pure power of her imagination, the way she crafts and dreams child-like eyes, building intricate stories and expansive lore around everything she doodles or glues together.

And while I poo-poo ideas of mine because I haven’t the money for the perfectly-grained piece of cherry carved from the rarest knotted old-growth stump, or haven’t the resources to make electrodes spark from telescoping arms of brass and silver – she crafts beautiful and intriguing gateways to incredible and outlandish strange worlds from scrap jewelry and salvaged paper products…

It seems I could take a lesson from her in hese regards, and from those I admittedly once scoffed at – get with the times and shed the bonds of my extravagant ambitions by showing a bit of fiscal responsibility and empathy, exercising that resourcefulness and practicality forgotten by many of us during these previous years…

Adversity has the effect of eliciting talents which, in prosperous circumstances, would have lain dormant.

~Horace (Quintus Horatius Flaccus), Satires

Posted on

Spooky Smile Mini Trio and Grand Re-opening 10% off

I’ve been working away 30 to 40 hour days to get my store up and running again and completely restocked. I can say that now, aside from t-shirts, comics, and a few other such things which really do not sell much at this venue anyway, everything current is stocked and I am good to go.

I am kicking this off by issuing a 10-percent off coupon. Use it as many times as you would like to through June 20th, share it with others. The coupon code is mxlplk just keep in mind that because of the way my cart handles coupons, the items will not be itemized in your paypal payment, just a total. Your purchase will however be recorded in the store, and in the email confirmation you receive from the store. So, don’t worry – I’ll know what you ordered.

There are also many new items available, as well as many old items which were never available before.

Smile Trio (picture of the prints)

One of the most note-worthy new additions is a trio from a small series of small paintings called “smile”. The original paintings of the girl-thing, creepy plant, and psycho robot are not up for sale in the store

Posted on

Coming to this Space

I’ve used a lot of my time this weekend link building: one of many necessary evils which come with being an artist on the web these days.

I’ll be working through the day at adding original works and mini prints, and then from there, I am going to be finishing out commissions while brainstorming on ways to make some very unique completely hand-pulled reproductions of some of my works.

Since Giclees are so incredibly accurate, so vivid in color, so perfect in contrast – it is really hard to make hand-pulled prints and make them better than the less expensive giclees – and I really do like to make giclees available to the people who frequent this site.

So, the task at hand is to come up with something that can be done by hand, and yet is more awesome than an actual-sized limited edition 200-years archival reproduction on canvas.

I think I have something in mind, some research and trial runs will tell if my idea is feasible, but I do hope to be announcing something extra special within this week.

Until then, wish me luck on finishing up these projects, and please don’t take it to heart if for some reason I do not get back to you as quickly as normal. I will be back soon.

Also, I wanted to add that I am trying to offer free advertising to fellow steampunks. These buttons top the links page, and float right below the headline article on the main page, really good placement. The button size is 117×60 pixels. You can contact me through my contact page if you are interested, I am giving first consideration to people who are willing to give return links, and of course people I am friends with on the various social networking sites and steampunk boards.