Posted on

Big Framing Adventure

When it comes to the expense of framing, shipping, the gallery’s percentage cut, the risk of needing to have things shipped back afterward, and all those instances where art gets stolen or damaged somewhere along the way, galleries close unannounced, or maybe never even existed – well, gallery showings are the sort of anxiety that I often find myself trying to avoid. For this reason I tend to prefer conventions if possible, or shows that are actually within driving distance.

And in those instances, I still often find myself in this sort of panicked state over things: Logistics, packing, unpacking, hanging, being around people all come in to play – but the highest anxiety of all, tends to come with framing.

Since I make most of my sales online, and since frames add significantly to the online selling price, and to the shipping cost – I tend to send my large originals unframed, unless otherwise requested – which means that I never bother framing them at all – until that rare chance to show someplace worthwhile and drivable presents itself… as things with galleries go, which often starts with a “showtime is two weeks from now and we need these in a few days”.

Being an artist, I never have money laying around to frame one piece, let alone three or five. If I ever find myself with a handful of bills to call my own, the money typically goes toward re-stocking on shipping tubes, getting a new run of merch made, having a run of prints printed, buying new canvas, new paints, something entirely new to try my hand at, or bigger and better versions of things I have, for making a bigger and better piece I’ve dreamed of being able to make.

If you are an artist who has ever needed something custom-framed for a coming show, and find that the framing stores have closed – or just cannot afford to have frames done at a gallery, or even craft store – a table saw (or a hand saw and a miter box) are often a god-send.

I typically make some pretty nice frames – though not as wonderfully ornate as those made from the sort of moulding that one can only get through a framing store, they are made from real wood – most often some really good real wood, and are incredibly durable and made to last. They also have a bit of hand-made charm to them, and often are a bit of artwork in their own.

Sometimes I add polymer clay, brass fittings, brass chains and ornaments, decorative tacks, wood appliques, or designs I have cut with a scroll saw; Sometimes I accent them through pyrography, or intricate carved details – they sky is pretty much the limit when making one’s own frames…

Well, the sky, time, and money…

This is one of those instances where money and time factored in more than most. This frame was not made from the chunk of fire maple I am saving for something, or the strip of cherry I am saving for something else – it was made from used pine, which came from supports for a stage set – though I almost used an antique door or two to have harder wood in this mix without using my reserved pieces.

Step 0: (Materials and Preparation):

Materials: Wood, wood glue

Tools: Saw, miter box (can be made with wood and saw), table saw (optional), clamps or straps or a bit of ingenuity to hold pieces tight until the glue dries, sand paper.

Recommended: Something to make the wood something more than just flat and boxy – such as a router, Wood burner, rotary tool, scroll saw, bits to decorate the frames with such as brass cabinet knobs, bits of chain.. the sky is the limit. Really, it depends on how intricate and perfect you want them – you can make them anything from folksy and bare, to contemporary and smooth/plain, to fine works of wood-crafting, to works of art in their own.

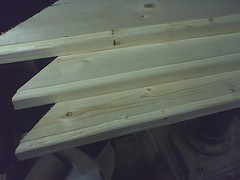
Preparation: I cut the pine pieces long-way with the table saw to make sure I had enough pieces, and that they were equally broad and equally thick. For the main part of the frame, I made two pieces that were 8 feet long, 3 inches wide, and 1 inch thick. From a 2×4 stud, I also made 2 pieces that were 8 feet long, 1 inch wide, and half an inch thick. You can skip that step if you can get to a hardware store and buy wood in this size – I recommend a few strips of select pine (heartwood pine) – It acts like hardwood, feels like hardwood, even *counts* as a hardwood to some – and is only about $3 a strip at Home Depot – buy 2 1x2s, 1x3s, or 1x4s, and one 1×1 – and you won’t need to do any length-wise cutting. If you do not have a table saw, a handsaw and a miter box will do. If you do not have a miter box – make one (3 pieces of wood, plus wood glue (or nails) and something the measure a 45 degree angle with). A good string wood glue in necessary. Ratcheting straps (tow straps) or corner clamps, or maybe even bar clamps if they are big enough for what you are working on – will save you a lot of frustration. Without pressure, the wood glue will take forever to dry, and your bonds will not be as strong or as clean. Paint, or wood stain, will probably also come in handy.

_Preview_.JPEG 
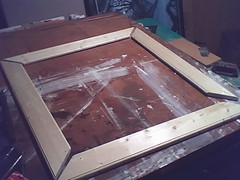
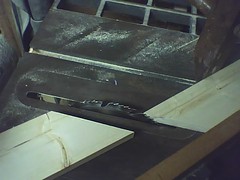
First step was to make a basic frame with an inside dimensions of 49×30 and outside dimension of 55 x 36. This construct is just flat wood and 45 degree angles – nothing fancy – all done with a table saw and an angle jig.
Frame in the worksA good amount of wood glue on the edges and some corner clamps made a boxy “finished” frame. Clamp tight, and let the glue dry at least 15 minutes. The tighter you clamp it, the better the glue will penetrate, the thinner it will fan out, and the faster it will dry.

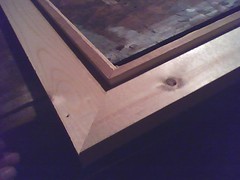
Then I made another such piece one out of thinner wood strips (which I cut off a bigger piece with the table saw), this one with 1/4 of an inch less for the inner diameter.

When the pieces for this “smaller” frame were done, I rounded their edges on the routing table, and then glued them together on the main frame – creating a lip big enough to hold in the painting but still covering as little of its edges as possible. (You can see what it looks like attached to the frame in the above image, and you can see a cross-section of the routed pieces in the image below)

_Preview_.JPEG_Preview_.JPEG

Frame in the works
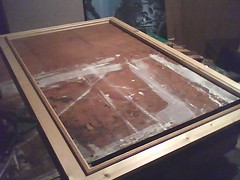
A wider view of the frame with the second “frame” glued to its top.
Gessoed Frame
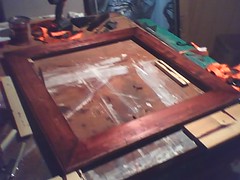
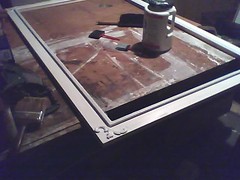
I added some wood appliques (available at Home Depot, Michael’s, Hobby Lobby) to dress up the corners some; I then took to covering the thing in a thin layer of gesso so the paint holds on better. Typically my finishing would mean I would stain, wipe, stain, wipe, stain, wipe, smooth, varnish, smooth, varnish, smooth, varnish… but such is a three day process (if I don’t miss a beat). I needed to get this frame done by morning- so…
_Preview_.JPEGI added a metallic finish to it (silver spraypaint), then soaked it in watered-down black acrylic, then wiped up the black save for the crevices, then brushed over it in black, and wiped the black away from the part that borders the painting. It looks like it is hewn out of decades-neglected silver or maybe pewter.

If I could go back and do it again (which I may someday down the line) I’d faux finish it a deep red oak. I thought about doing this – but I’d like to see if I can get two hours rest in before we have to leave.

Finished
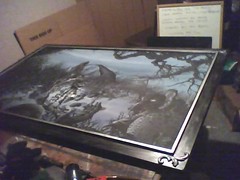
This painting is just popped into the back. I typically cover the back with some really heavy craft paper – but I don’t have nearly enough on hand for that. The hanging wire is fastened into the painting itself on this piece, the the frame is more of a decorative surround, not a means to hang by. I may however move the hanging wire to the frame, just to be ‘normal’.

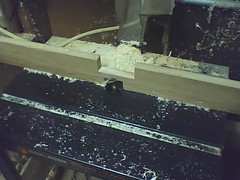
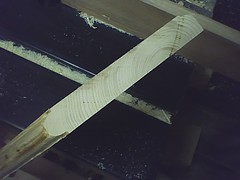
Below are some pics from another frame in progress. I routed both edges on one side (the inside edge), and rounded just one on the outside edge. The painting (a thin painting on hardboard) will rest within the router-made recess made in the inside edge). The outer edge has only one flat side so the assembled frame will sit flush against the wall.

I will probably stain and varnish this one – and will probably simulate the look of an age-old frame with multiple layers of stain, and leaving bits of extra stain in the crevices with each step.

_Preview_.JPEG_Preview_.JPEG_Preview_.JPEGStained

Posted on

Red Hand Assemblage

Red Hand Assemblage Showing Hand
Red Hand Assemblage

This artwork is three in one.

The box/dual frame: I labored hard for over a week on the box, which is a very sturdy hand-built, hand-stained, hand-varnished, hand-waxed chunk of quality hardwood (heartwood select pine base and birch sides). It not only serves as a box (if you would want to use it as such a thing), but as a self-contained double frame which requires no wall hanging. It is perfect for a coffee table, end table, mantle, dining table or most any flat surface you would like to display it on… and it is so sturdy in construction that you won’t be freaking out if people get near it.

Red Hand Assemblage Showing Both

The box has two decorative hinges with a decorative patina on the spine edge if it; The latching mechanism is self-made from another smaller version of these hinges, combined with three solid brass model cannons from a model ship. The latch holds the piece securely shut, but opens easily when you want it to with a slight squeeze of the box and an easy flip of the thumb.

Latching Mechanism detail

I spent hours and hours and hours buffing and buffing this piece. You may not see the glossiness of it in the picture, but it is pretty shiny.

Open Assemblage Box Frame closed
Red hand Assemblage Box Frame closed (standing, latch side)
Red Hand Assemblage Open
Red Hand Assemblage Open, spider side showing
Open Assemblage Box Frame closed
Red Hand Assemblage Box Frame closed

Sometimes antiquing involves making something look beaten and ratty, sometimes it is a matter of making something look like something of quality kept new by an archivist or generations of enthusiastic caretakers – quality and new as the day it was made. For this particular look, I went with making it look like somewhat well-maintained antique… something once very expensive, polished periodically by its owners – well protected, but also well-used.

This sort of antiquing makes it much more involved than the other two. When I do this sort of antiquing on fresh and new untreated wood, making it look fashionably old is essentially a process of finishing and refinishing it to duplicate what time would do: Creating many stages of maintenance and multiple areas of color to create the look of something old… dark areas near crevices and hard to reach spaces, lighter areas where regular wear might occur.

Open Assemblage Box Frame on its side

The Art: To make these illustrations mesh well with the box, I made them in this dark-carnival, old Victorian occult ephemera style, with a lot of metaphysical flavor and a touch of campy horror propmaking. It not only made them work well with the box I envisioned, but made them fun for me and strikingly bold… a primitive and stark contrast to my normal reserved and detailed works and my muted color palettes.

Red Right Hand detail
Red Right Hand

Painting One: “Red Right Hand” this is one of two pieces done for a collaborative collection of China Miéville inspired illustrations and artworks, an effort assembled and coordinated by John Straun of SuperPunch. The Handlingers are mind-controlling creatures which look much like a human hand with a snake’s body. I decided on red for my colors because I wanted the hand to be red, and I might it a right hand just so I could name the piece “Red Right Hand”, because I am a huge Nick Cave fan.

Limited Edition Giclees (limited edition of 20) are available in my store

Red Right Hand detail
Weaving Spiders Come Not Here

Painting Two: “Weaving Spiders Come Not Here”: I often name images for all of the phrases that swim around in my head. I don’t know what it is about soliloquy, sayings, proverbs, historical quotes and other such things that causes them to remain so well-embedded. I start working on a piece, and once he concept is in place, I immediately think of some string of words that fits, though usually a twist thereof. Rarely does the phrase inspire the piece, but the piece typically inspires the title, and the title sometimes shapes the work… this title coming from Shakespeare, or the once-curious reliefs seen outside of Bohemian Clubs. “The Weaver” is a large sentient spider with hands on its forelimbs (I also put them on its Pedipalps), with a love for scissors. The Spider with scissors brought this phrase to mind, so rather than repeating the more circular designs from the previous painting, I made them weave like webs, being cut by the spider.

Limited Edition Giclees (limited edition of 20) are available in my store

Weaving Spiders Come Not Here detail
Open View
Open View

SuperPunch: Superpunch.blogspot.com
China Meiville: Rejectamentalist Manifesto

All three works – the dual frame box assemblage, and the two paintings, are available as one piece in the originals section of my store.

Posted on 11 Comments

Custom Framing on an Artist’s Budget

One of the more painful and costly steps along the way to an art show or convention for us, and other artists we know, is most always framing.

It seems that artists and artisans anymore, can be some of the most heavily exploited tradesmen when it comes to tools and supplies …and frames are certainly no exception.

Art supplies tend to be priced for Warhol-famed artists, design agencies with multi-million dollar clients, or students who simply have to have these things, and will have to take out loans and grants accordingly; Frames are often priced for artists of Ryden renown, or remarkably wealthy art buyers – factor in huge percentages for art sales through galeries, and it is no wonder that the gallery owner lifestyle of nice cars and sipping champagne contrast so beautifully with those of the artists supported: which I suppose for most of us… well, I don’t know how you get by, but lets say “robbing liquor stores for brush money” as a rather broad example.

And since for any show or convention it is good – if not mandatory, to have hang-able art. Many of us artists need to get creative if we wish to account for a 40% cut on sale price, and frames, without demanding a “Just who does he think he is?” sort of price.

One route, of course, is to gallery-wrap, or museum wrap paintings and giclees in a way that makes for a nice display without the need of a frame. Add a touch of color or a reflected image to the overlap, and such things do really tend to look very nice… though modern by default. Gallery wrapping and museum wrapping is available as an option for ready canvas through most any art supply provider, and having giclees stretched these ways is an option with most decent giclee printer. Doing this one one’s own is moderately difficult for gallery wrap, and strenuous for museum wrap – but by no means impossible.

If however your works are already stretched and mounted, with staples down the sides, or if they are painted/drawn/engraved on boards or paper and absolutely need to be framed – there are still a few creative, inexpensive, and simple ways to go.

One of which – if your works will fit standard frame sizes, is to go on “50% off!” weeks (we like to call them “regular price weeks”) to Hobby Lobby or Michael’s and buy their pre-made frames. Another solution of course is to go to places such as Target and Walmart and browse, looking for discounted frames that can be redecorated and customized to look nice… perhaps even to become works of art in their own.

One problem I have found with many of the ready-made frames (and even many custom frames), something I particularly dislike, is that I find many of these frames are either plastic, or low-grade wood, either made to look like better wood by way of plastic/acrylic veneers or overlay, ornate clay designs painted or coated over, or by other means. The most standard being those which are low-grade wood with the clay and paint overlay, which tends to chip and break in shipping… if it isn’t already broken in this way at time of purchase. The ones at non-art stores tend to be plastic molding with a plastic wood-grain sheet ironed onto them… again… trying to avoid that.

So, yesterday, after browsing many ready made frames at all the aforementioned stores, not finding anything I liked at a reasonable price – and finding mostly overpriced junk, I decided to try to make my own.

The first step was a trip to the hardware store for lumber, where I purchased four 6’x4″x1″ pieces of wood.. having struck out on all avenues in looking for a source for the wood strips framing galleries use. I’ll have to try that some other day.

So… wood…

I’d like to say I went for the fine cherry, a nice fire maple, or something moderately exotic – but what I ended up going for was a compromise.

At Home Depot, I found their “exotic wood” be be very exotically priced. I am used to prices being high on hardware at woodcraft – but Woodcraft’s prices certainly beat (by light years) the wood prices at Home Depot. I will have to remember: Woodcraft for wood, Home Depot for hardware.. but, of course it was late at night when we went… So Home Depot was pretty much where we were going for the lumber.

Pine being cheap and sub-quality wood, I looked to avoid that route – but in the good wood section I found what is called “select pine” – which is not quite gold-grade heartwood pine, but certainly not shabby construction-grade pine. It is nice and heavy, very dense actually, with a really fine grain and very tiny knots. I was rather surprised by how sturdy and dense it was, and at $4.19 a  6 foot piece – I decided to give it a try (and having tried it, I am actually quite happy with it).

[Edit] Having returned, and taking a closer look at Home Depot’s stock, I also found some really nice Maple there for about $1.40 a linear foot – still more expensive than the pine, about twice the price but certainly not bad. I also found cherry and red oak shelf capping for around $1 a foot, which I plan to use in future projects in place of the moulding below.

moulding
Molding

I also grabbed some decorative wood strips from Home Depot (sort of like above, but not the same design)… rounded and decorative on one side, flat on another. My plan is to use these to make the frames a touch more ornate. The price wasn’t bad.. $2.16.. Oh? Not “per piece” .. that’s a linear foot? Okay… I bought one six foot section. Also in my arsenal is some brass chain at Hobby Lobby (clearance priced)… about 120 inches of it. Home Depot had wood appliques – but their prices on those were ridiculous – I am supposing they were trying to get as much as possible out of cabinet makers. The things are incredibly cheap by comparison at Michaels… I’ll have to go there tomorrow, as they didn’t have them at Hobby Lobby and I wasn’t about to pay the Home Depot price for them.

Wood Applique
Wood Applique

So… first step: Cutting the wood

So… first step… measuring the wood.

These artworks are 5×7 inches. So, I want the inside of my frame to be about 1/8 of in inch smaller than that. Typically I’ll sit there and figure up the best mathematical formulae to get the perfect result – but diving right in, I simply measured 1/8 of an inch in, and used my 45-degree plastic triangle to mark where the first 45 degree cut would intersect that drawn line. I measured 6 + 3/4 (7 inches minus two times 1/8 of an inch) of an inch along that line, marked that point, and used the triangle to draw a line where the next cut would go.

From there I carefully and precisely made the first cut on the table saw, using my 45-degree angle-guide. Then I carefully and precisely made my second cut. From there it was just a matter of sliding forward my 45-degree guide, placing one edge against the (stopped) table saw blade, and lining up the straight guide to the end of that piece. After this I could just cut, flip the wood over, cut, and flip the wood over, making perfectly identical trapezoidal wooden pieces… my 7-inch sides.

Table Saw: The same 45 degree jig and same position as the very first cut. The difference is the piece is flipped and moved to the guide in order to reflect the opposite angle, and the achieve the right length. This can also be done with a miter box, but the table saw really makes it go much faster.
Table Saw Guide - My clamp keeps the wood from popping/leaning up, or sliding along the guide.

After cutting the first two, just in case my angle guide was not entirely accurate, I matched up corners on the cut pieces, and checked them with my triangle, to make sure they were squaring up. They weren’t. So I made an adjustment of half a degree – and used these pieces over and over again until the angle was perfect.

One of the cut pieces. Remember - Trapezoid, not parallelogram. No adjustments need to be made to the guide for this, just flip the wood. Also note my sleeves... not recommended for anyone without a death wish. Loose sleeves, long sleeves, are not the best attire for workshops.

I made 18 of these long sides, saving the first two ‘test pieces’ for use in making the shorter sides, since they were shorter after all the test angling.

Then I made the 5-inch sides, in the same manner as above, until I 18 of those as well.

After this, I needed to make it so that the artwork could rest inside the frame, meaning that 1/8 inch recess (rabbet) planned for needed to be carved into the inside dimensions along the back of the frame-to-be. This is a good time to have a router (and a router table is all the better).

*If you do not have a router, which I am sure a lot of you may not, I would recommend starting with decorative beading (the sort of trim that, in a house, runs along a floor or a ceiling… available at most lumber stores). From there you can just build a simple square and square-edged frame for your work, with the inside of this being the exact size of your artwork (n0 need for a rabbet), but use the measuring and cutting steps above on the trim. The trim can be assembled on top of the box frame, glued, pressed, and clamped for a very nice look and sturdy frame. Those are the basics… I’ll go over that particular method in more detail, but it will have to wait for another post*

Router and Router table - I set up two guides for this one. One to set how far back towards the bit the wood piece can go, one to keep it down to the table (while at the same time to keep my fingers away from the bit)

I used a router bit which has a curved into flat bevel, called an “ogee”. The flat edges would hold the artwork well, and the rounded surface would allow for the least amount of surface contact on the art side of the artwork.

common router bits and their profiles
Routed edge - better than a rabeted edge, because the curve keeps more of the arts surface away from the frame itself, which prevents a rubbing on the art surface.
Routed edge - better than a rabeted edge, because the curve keeps more of the art's surface away from the frame itself, which prevents a rubbing on the art surface.

I also used this same decorative “Ogee” bevel on the inside front as well. As a bonus, being the same on the inside dimension front to back, I could choose which side looked the best (according to the smoothness of the cut, the look of the grain, dents and dings, etc.) .

Having chosen which side would face front, I then took to beveling the Outer Edge on front side, giving it a smoothed and decorative face on the front (inside dimension and outside), but leaving the back flat and flush. For several of my frames, I also made the back outer edge beveled as well, giving the frames a nice rounded edge.

Three routed edges - two on the inside near the artwork, one on the front and outside of the frame. The fourth edge is left plain so it can be flush with the wall.
Three routed edges - two on the inside near the artwork (against my thumb), one on the front and outside of the frame. The fourth edge is left plain so it can be flush with the wall.

Once I had all my pieces done, I quickly sanded off all frayed edges and burs from my cuts, so the frayed ends would not get in the way of the next step: gluing.

A stack of frame pieces, ready to debur, glue, and press.

Glue, actually holds more securely than nails or screws, if done properly, and of course keeps unsightly nails and screws from your frames. Such also negates the risk of splitting your pieces with such fasteners during the construction process.. which would be a terrible waste of all the work done up to now. There are special fasteners for framing (to be used later), but the glue is most important.. and will make that fastener step much easier if you choose to use fasteners.

I used a four-point box clamp for this. It makes jobs like framing, assembling stretcher bars for canvases, making boxes/cabinets, all go much more smoothly with these sort of clamps. If you don’t have them, I’d recommend using two (preferable four) bar clamps or pole clamps for this step.

4-way clamp around the frame, glue at each edge. The pressure pushed glue deep into the end grain, giving the frames a very strong and sturdy bond.

Put glue along the ends of each piece, in thin streams, but try to cover most of the ends, and try as best you can to get the very edges of each end. Clamp them together, make sure all pieces line up square and even. Un-clamp and re-clamp if necessary… Such is much better than letting it dry uneven and having to redo this step or sand things down.

Let the frame sit this way for at least a half hour (preferably longer) before moving it. If it has only been sitting a half hour, remove move it carefully and then leave it be. You will however get better results if you leave each frame clamped for an hour or more. I plan to use 3/8 corrugated fasteners on each corner – they aren’t completely necessary, but they give a bit of added peace of mind to neurotic people such as me.

corrugated fastener
corrugated fastener
Not-so-finished product. Staining and other decoration yet to be done, as well as the addition of the hanging hardware. The artwork is not secure yet btw; It is just there for the photo.

Next steps – added (wood) decoration, staining, added decoration (metal), placing the artwork, hardware (for hanging).

(Next installment)