Posted on

New Wallpaper: The Ruins 1280×800

This piece is somewhat based on my collaborative work with Bethalynne Bajema … That 30 foot x 10 foot mural we have sitting in our garage awaiting a studio space to display it in.

The mountain city-scape in this picture is *heavily* influenced by her creations, as well as my desire to see them as functional parts of a mountain landscape.

The original is available here: [link]

35 signed, dated, Limited Edition Giclees ($90) are available here – but the first ten are available at $55 here: [link]

The-Ruins-1280x800 Steampunk Fantasy Art Desktop Wallpaper by Myke Amend
The-Ruins-1280x800 Desktop Wallpaper by Myke Amend
Posted on

Skins Are Now Available through Uskins!

Skins are now available at Available at MykeAmend.Uskins.com!

Below is a small sampling of skins available there. Right now I have over 22 images available for Laptops, Game Consoles, hand-held games, Cell Phones, Gaming controllers, Ipads, and more.

Go to MykeAmend.Uskins.com to view the whole assortment, and check back often for new additions.

steampunk and gothic skins for laptops hand helds cell phones and more

Posted on 2 Comments

The Kiss

Since it is so cold in here, that paint won’t even properly cure, I’ve decided this week to revisit a number of those things I put on hold over the summer, things which needed some digital treatment to be complete.

This illustration is a scene from Dexter Palmer’s novel “The Dream of Perpetual Motion”, originally done for web resolution, I have had this piece slated for repainting for some time now, and finally I’ve finished it, and on a big scale- since it was my very favorite from the set.

This print is finally available as a *huge* 16×20 inch giclee on fine art rag paper (here), and as an 11×14 metallic print (here).

The Kiss - Digital Painting by Myke Amend for Dexter Palmer's The Dream of Perpetual Motion
Full View
The Kiss - Digital Painting by Myke Amend for Dexter Palmer's The Dream of Perpetual Motion
Detail One
The Kiss - Digital Painting by Myke Amend for Dexter Palmer's The Dream of Perpetual Motion
Detail two
Posted on 3 Comments

Full Steam Ahead

This piece was done earlier this year in pencil on bristol board; It was my intention to color all of these after the World Steam Expo, but one thing led to another and – well, I finally have this once all colored up.

The 11×14 black and white giclees of the original pencil drawing are still available (here), and there are only a handful of those left, but now available are 30 of these colored ones (here) – same size, printed in pigment inks on same high quality fine art rag paper. An open edition 8×10 metallic is also available (here)

MACH Turtle steampunk Alice in wonderland Alice through the looking glass panting by Myke Amend
MACH Turtle by Myke Amend
MACH Turtle Detail - steampunk alice in wonderland painting by Myke Amend
MACH Turtle Detail
MACH Turtle Detail - Steampunk Alice through the looking glass painting by Myke Amend
MACH Turtle detail 2
Posted on

New Additions

The Destination 1111 show gave me the opportunity to show a number of works that I hadn’t previously been able to show at any official showing or convention.

Speaking of which, I now have several current and ongoing art displays running, which I recommend if you are in the Massachusetts, Northern California, or Illinois area; They are at: Gallery Nucleus (Alhambra California), The Charles River Museum of Industry and Innovation (Waltham, Massachusetts), and Gallery Provocateur (Chicago Illinois *beginning October 30th*).

Some of the works I showed at Destination 1111 dated back as far as ten years ago, one or two have been available here as prints for a while, but there were a handful of them which I had never been able to offer here, and was unsure whether to offer here. Not that life for me has ever been all that easy, but several of these pieces were from an exceptionally rough time, which made me hesitant to show them … But, given their reception at the 1111 show, and because they were widely requested, I finally decided to have them imaged.

This week, Jim Gebben, an extraordinary photographer from Grand Rapids, who I met during our Artprize run, spent some time taking some fantastic high res photos of my non-imaged works – so, I am not only finally able to offer prints of these, but finally able to offer some more originals as well.

Here are some of the new offerings:

Arclight 24x24 Oil on Panel

Arclight: Available as:

Original 24×24 painting (framed 32 inches by 32 inches)
Giclee on Canvas (limited edition of 20)
Giclee on Fine Art Rag (limited edition of 20)
12×12 Metallic print (open edition)

The Day You Died 16x20 acrylic on canvas

The Day You Died: Available as:

Original 16×20 painting (unframed, with option for framing)
Giclee on Canvas (limited edition of 10)
Giclee on Fine Art Rag (limited edition of 20)
11×14 inch Metallic print (open edition)

Drill Baby Drill 24x36 Acrylic on Canvas

Drill baby Drill: Available as:

Original 24×36 painting (unframed, with option for framing)
Giclee on Canvas (limited edition of 20)
Giclee on Fine Art Rag (limited edition of 20)
12×18 inch Metallic print (open edition)

The Wait - 24x36 Acrylic on canvas

The Wait: Available as:

Original 24×36 painting (unframed, with option for framing)
Giclee on Canvas (limited edition of 20)
Giclee on Fine Art Rag (limited edition of 20)
12×18 inch Metallic print (open edition)

Posted on

Colour from Space

Dead Sea Painting by Myke Amend

An experiment in color, recently completed as a commission for Mike Skoog, wherein he asked if I could do something small enough for his music room, and more colorful than my standard muted palettes.

I went the more impressionistic route with this one, and instead of starting with the colors as I wanted them, I started with the nearest primary colors in their place, and worked downward in saturation and sideways in hue, until I reached this point.

Details are painted so incredibly thin, that I practically painted them with the very corner of a single hair, dropping molecules of paint in a line for stitches and ropes and other details. In this, I am reminded that working smaller is actually harder, not easier, because I still feel compelled to add my standard amount of detail…but in a smaller space (which means eye-strain and neck cramps in spades, and a more time-consuming work).

All the same, sometimes I like working small just for the opportunity to test my patience and practice my hand.

That was the second to last of all the commissions that remained on my plate before Artprize… one more to go, then I am my own man until I sell another…

Signed and dated giclees of this are available for only $25 here for a limited time, or $30 through Etsy

Posted on

Big Framing Adventure

When it comes to the expense of framing, shipping, the gallery’s percentage cut, the risk of needing to have things shipped back afterward, and all those instances where art gets stolen or damaged somewhere along the way, galleries close unannounced, or maybe never even existed – well, gallery showings are the sort of anxiety that I often find myself trying to avoid. For this reason I tend to prefer conventions if possible, or shows that are actually within driving distance.

And in those instances, I still often find myself in this sort of panicked state over things: Logistics, packing, unpacking, hanging, being around people all come in to play – but the highest anxiety of all, tends to come with framing.

Since I make most of my sales online, and since frames add significantly to the online selling price, and to the shipping cost – I tend to send my large originals unframed, unless otherwise requested – which means that I never bother framing them at all – until that rare chance to show someplace worthwhile and drivable presents itself… as things with galleries go, which often starts with a “showtime is two weeks from now and we need these in a few days”.

Being an artist, I never have money laying around to frame one piece, let alone three or five. If I ever find myself with a handful of bills to call my own, the money typically goes toward re-stocking on shipping tubes, getting a new run of merch made, having a run of prints printed, buying new canvas, new paints, something entirely new to try my hand at, or bigger and better versions of things I have, for making a bigger and better piece I’ve dreamed of being able to make.

If you are an artist who has ever needed something custom-framed for a coming show, and find that the framing stores have closed – or just cannot afford to have frames done at a gallery, or even craft store – a table saw (or a hand saw and a miter box) are often a god-send.

I typically make some pretty nice frames – though not as wonderfully ornate as those made from the sort of moulding that one can only get through a framing store, they are made from real wood – most often some really good real wood, and are incredibly durable and made to last. They also have a bit of hand-made charm to them, and often are a bit of artwork in their own.

Sometimes I add polymer clay, brass fittings, brass chains and ornaments, decorative tacks, wood appliques, or designs I have cut with a scroll saw; Sometimes I accent them through pyrography, or intricate carved details – they sky is pretty much the limit when making one’s own frames…

Well, the sky, time, and money…

This is one of those instances where money and time factored in more than most. This frame was not made from the chunk of fire maple I am saving for something, or the strip of cherry I am saving for something else – it was made from used pine, which came from supports for a stage set – though I almost used an antique door or two to have harder wood in this mix without using my reserved pieces.

Step 0: (Materials and Preparation):

Materials: Wood, wood glue

Tools: Saw, miter box (can be made with wood and saw), table saw (optional), clamps or straps or a bit of ingenuity to hold pieces tight until the glue dries, sand paper.

Recommended: Something to make the wood something more than just flat and boxy – such as a router, Wood burner, rotary tool, scroll saw, bits to decorate the frames with such as brass cabinet knobs, bits of chain.. the sky is the limit. Really, it depends on how intricate and perfect you want them – you can make them anything from folksy and bare, to contemporary and smooth/plain, to fine works of wood-crafting, to works of art in their own.

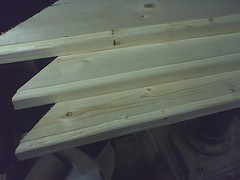
Preparation: I cut the pine pieces long-way with the table saw to make sure I had enough pieces, and that they were equally broad and equally thick. For the main part of the frame, I made two pieces that were 8 feet long, 3 inches wide, and 1 inch thick. From a 2×4 stud, I also made 2 pieces that were 8 feet long, 1 inch wide, and half an inch thick. You can skip that step if you can get to a hardware store and buy wood in this size – I recommend a few strips of select pine (heartwood pine) – It acts like hardwood, feels like hardwood, even *counts* as a hardwood to some – and is only about $3 a strip at Home Depot – buy 2 1x2s, 1x3s, or 1x4s, and one 1×1 – and you won’t need to do any length-wise cutting. If you do not have a table saw, a handsaw and a miter box will do. If you do not have a miter box – make one (3 pieces of wood, plus wood glue (or nails) and something the measure a 45 degree angle with). A good string wood glue in necessary. Ratcheting straps (tow straps) or corner clamps, or maybe even bar clamps if they are big enough for what you are working on – will save you a lot of frustration. Without pressure, the wood glue will take forever to dry, and your bonds will not be as strong or as clean. Paint, or wood stain, will probably also come in handy.
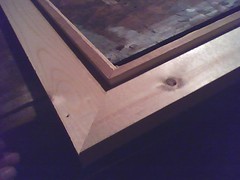
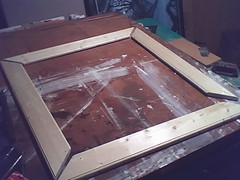
_Preview_.JPEG First step was to make a basic frame with an inside dimensions of 49×30 and outside dimension of 55 x 36. This construct is just flat wood and 45 degree angles – nothing fancy – all done with a table saw and an angle jig.
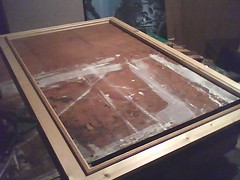
Frame in the worksA good amount of wood glue on the edges and some corner clamps made a boxy “finished” frame. Clamp tight, and let the glue dry at least 15 minutes. The tighter you clamp it, the better the glue will penetrate, the thinner it will fan out, and the faster it will dry.

Then I made another such piece one out of thinner wood strips (which I cut off a bigger piece with the table saw), this one with 1/4 of an inch less for the inner diameter.

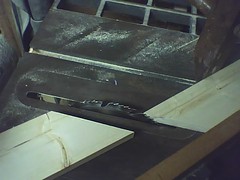
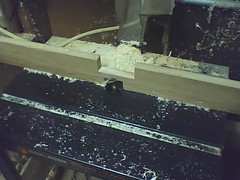
When the pieces for this “smaller” frame were done, I rounded their edges on the routing table, and then glued them together on the main frame – creating a lip big enough to hold in the painting but still covering as little of its edges as possible. (You can see what it looks like attached to the frame in the above image, and you can see a cross-section of the routed pieces in the image below)
_Preview_.JPEG_Preview_.JPEG

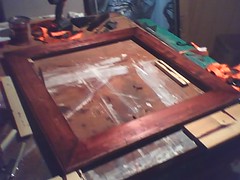
Frame in the worksA wider view of the frame with the second “frame” glued to its top.
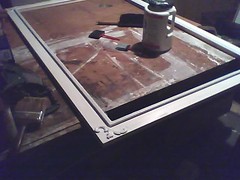
Gessoed FrameI added some wood appliques (available at Home Depot, Michael’s, Hobby Lobby) to dress up the corners some; I then took to covering the thing in a thin layer of gesso so the paint holds on better. Typically my finishing would mean I would stain, wipe, stain, wipe, stain, wipe, smooth, varnish, smooth, varnish, smooth, varnish… but such is a three day process (if I don’t miss a beat). I needed to get this frame done by morning- so…
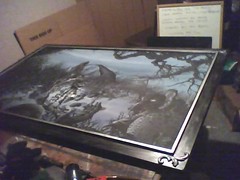
_Preview_.JPEGI added a metallic finish to it (silver spraypaint), then soaked it in watered-down black acrylic, then wiped up the black save for the crevices, then brushed over it in black, and wiped the black away from the part that borders the painting. It looks like it is hewn out of decades-neglected silver or maybe pewter.

If I could go back and do it again (which I may someday down the line) I’d faux finish it a deep red oak. I thought about doing this – but I’d like to see if I can get two hours rest in before we have to leave.

FinishedThis painting is just popped into the back. I typically cover the back with some really heavy craft paper – but I don’t have nearly enough on hand for that. The hanging wire is fastened into the painting itself on this piece, the the frame is more of a decorative surround, not a means to hang by. I may however move the hanging wire to the frame, just to be ‘normal’.

Below are some pics from another frame in progress. I routed both edges on one side (the inside edge), and rounded just one on the outside edge. The painting (a thin painting on hardboard) will rest within the router-made recess made in the inside edge). The outer edge has only one flat side so the assembled frame will sit flush against the wall.

I will probably stain and varnish this one – and will probably simulate the look of an age-old frame with multiple layers of stain, and leaving bits of extra stain in the crevices with each step.
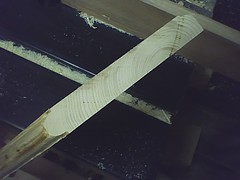
_Preview_.JPEG_Preview_.JPEG_Preview_.JPEGStained

Posted on 1 Comment

Opening Day at ArtPrize

I was hoping to have this piece done by the early hours of the morning – a wood carving and painting. About 52 inches by 48 inches – mahogany, walnut, and pecan stain on carved birch panel.

I still need to build a box out of it, fill the box with foil and LEDs and wire, drill holes where I want lights, varnish it, line the holes with gold leaf, and put several coats of wax on it… probably about another 8 hours or so…

But I thought you might appreciate a progress pic (bottom)

Artprize has been several months of crazy for us – everything falling through one thing after another, and being given the run around from so many different directions. Artprize opened today, and we only got access to our venue yesterday, where we are working on a huge painting, the slimmed down version of our big circus, architecture, and art extravaganza.

If you are coming out for that – don’t worry, we found new homes for all of our acts (most are at the BOB at their scheduled times), found a place to host our artwork (One Girls Treasure on Lyon Street), and put together many picnics throughout the Artprize grounds and throughout the 19 days of Artprize.

Our art installation at One Girls Treasure is amazing BTW – much thanks to Bethany Grenier, Kate Jauw, and of course Bethalynne Bajema.

We are still recovering financially from all the AAAAAAAAAAAAGHHH! – and still have a bit of fundraising we can stand to do… especially Bethalynne and I who have pretty much gone sleepless and foodless and put aside all other work through this whole endeavor. I don’t want to get any more behind on shipping, so I introduced the SUPER SPOOKY STEAMPUNK GRAB BAG of AWESOME – which will ship just in time for Halloween. What is it??? I have no idea!!! But they are $15 and I will load them with more than $15 worth of incredible things from this project and something unique to these grab bags.

Proceeds of course go to building supplies and some spaghetti maybe. These are available for a very limited time, and until they run out.

A quick snapshot of the work in progress - Gadreel over Machinac Bridge
Posted on

Tees!


CirqueACirca Cotton Tee

Our beautiful shirts from Extreme Screen Printing have arrived. They are printed in 2 colors on an all-cotton heavyweight desert sand colored t-shirt – with art by Bethalynne Bajema, an incredible logo design by Ted Jauw, layout/pre-press by Myke Amend, modeled for by Cassie Truskowski, and loved by everyone who sees them.

Buy yours here: http://cirqueacirca.com/artprize/?page_id=131&category=5&product_id=26

Posted on

The Art of Cirque A Circa

Cirque A Circa (A Circus Out of Time) is coming up fast, and with it our 121st Annual RetroNauticon – which is much like a convention, but without registration fees and admission fees.

In a work of art nearly the size of two football fields, we will have many performers throughout the ArtPrize competition. Performers include airial, fire-spinning, fire-eating, and other sideshow performances by Cassie Truskowski, Author Bethany Grenier, Local Artist Ted Jauw, and many others – as well as fashion shows, and of course music: Such as acts by Zoe Boekbinder of Vermillion Lies, and also by The Gypsy Nomads – a great band last seen (by us) at the World Steam Expo.

You may, or may not be able to make it – but this promotional art featuring the Art of Bethalynne Bajema, and Ted Jauw’s Cirque A Circa logo and the Love ambigram is well worth-grabbing while it is still available. Not only do you have the chance to snag some wonderful and rare art for a low price, but you get to take a part of this event by supporting the artists behind it… thereby supporting the event (not having to find and earn money to eat on allows us more time to put towards this monumental effort).

Special Prints for Cirque A Circa by Bethalynne Bajema

Not only is Bethalynne offering these limited edition images for a very low price on the CirqueACirca page (direct link to the shop), but she has a beautiful limited edition (limited to only 21 prints) 8×10 metallic from this series available on her site, here ($2o): http://bethalynnebajema.com/scriptorium/?page_id=42&category=9